JangJang Shimaho Service Mode
What appears below is an English translation of the service menus of Visco’s Lovely Pop Mahjong JangJang Shimasho (ビスコの「ラブリーポップ麻雀雀々 しましょ), running on an SSV arcade amusement system. These translations are made available in the hope that they will be useful. I make no representations about accuracy or fitness for any purpose. No responsibility is accepted for any damage caused directly or indirectly by these translations.

Display Test
Although this game is configured entirely using DIP switches, the service mode provides a number of useful diagnostics, and gives a complete display of the DIP settings. To get started, switch on the service mode DIP switch (DIP1-3) and switch the machine on (or reset it if it’s already on). It should boot to the display test shown to the right (crosshatch and colour bars). When you’re happy with your monitor settings, press any button to get past this screen and display the test menu.
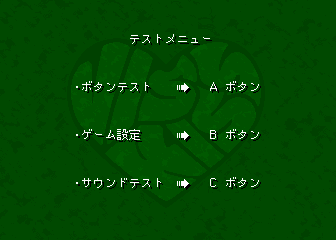
Test Menu
To the right you can see the main test menu. (If you don’t know how to get here, read the previous section.) Not much there, really. This is what it means:
Test Menu • Button Test > A Button • Game Settings > B Button • Sound Test > C Button
Just hit the indicated button to go to the desired test.
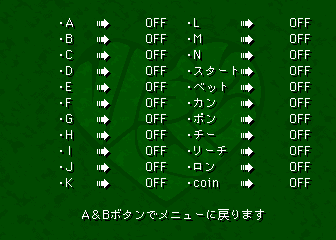
Button Test
You will see the screen shown to the right if you press the A button at the test menu. This lets you see whether the buttons and coin mechanism are working or not. Why did they decide to write “coin” in English? Your guess is as good as mine. Most of this is obvious, and the rest you should be able to guess, but anyway:
•A > OFF •L > OFF •B > OFF •M > OFF •C > OFF •N > OFF •D > OFF •start > OFF •E > OFF •bet > OFF •F > OFF •kan > OFF •G > OFF •pon > OFF •h > OFF •chi > OFF •I > OFF •reach > OFF •J > OFF •ron > OFF •K > OFF •coin > OFF Return to the menu with the A and B buttons
Press a button, and the relevant text should change from OFF to ON (and vice versa). Press A and B simultaneously to get back to the test menu.
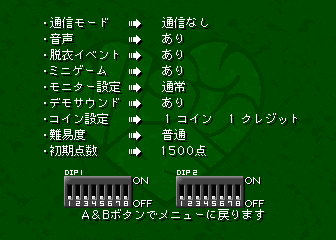
Game Settings
Settings are configured using DIP switches. But if you want to know whether the DIP switches are working, or if you want to know what the settings actually are, you can press B at the test menu to get to the screen shown to the right. As you can see, it’s shown with all the DIP switches in the off position. This display does update as you change the DIP switches. In English it would say:
Communication Mode > No Communication Voices > On Undressing Event > On Minigame > On Monitor Setting > Normal Coin Setting > 1 Coin 1 Credit Difficulty > Normal Initial Score > 1500 Points Return to the menu with the A and B buttons
Since there are a number of possible values for each item, your screen probably doesn’t quite look like this. So here’s a list of all the possible values:
- Communication Mode (通信モード – DIP2-7 and DIP2-8)
- 通信なし
- No Communication
- ボード1(メイン)
- Board 1 (main)
- ボード2(サブ)
- Board 2 (sub)
- Voices (音声 – DIP1-7)
- あり
- On
- なし
- Off
- Undressing Event (脱衣イベント – DIP2-3)
- あり
- On
- なし
- Off
- Minigame (ミニゲーム – DIP2-4)
- あり
- On
- なし
- Off
- Monitor Setting (モニター設定 – DIP1-2)
- 通常
- Normal
- 反転
- Inverted
- Coin Setting (コイン設定 – DIP1-5 and DIP1-6)
- 1コイン 1クレジット
- 1 Coin 1 Credit
- 2コイン 1クレジット
- 2 Coins 1 Credit
- 1コイン 2クレジット
- 1 Coin 2 Credits
- 2コイン 3クレジット
- 2 Coin 3 Credit
- Difficulty (難易度 – DIP2-1 and DIP2-2)
- 普通
- Normal
- 易しい
- Easy
- 難しい
- Difficult
- めちゃ難しい
- Extremely Difficult
- Initial Score (初期点数 – DIP2-5 and DIP2-6)
- 1500点
- 1500 Points
- 1000点
- 1000 Points
- 2000点
- 2000 Points
- 3000点
- 3000 Points
The values of the machine settings aren’t displayed, but they are service mode on DIP1-3 and disable demo sound on DIP1-4 (the DIP switch positions are shown, though). DIP1-1 and DIP1-8 are also shown, but they don’t appear to do anything. You can get back to the test menu by pressing A and B simultaneously.
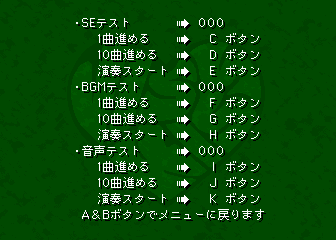
Sound Test
Press the C button at the test menu to get to the sound test screen, shown to the right. Here you can test sound effects, background music and voice samples. You can even get it to play one of each all at once! Here’s what it means in English:
• SE Test > 000 Advance by 1 tune > C Button Advance by 10 tunes > D Button Start Playback > E Button • BGM Test > 000 Advance by 1 tune > F Button Advance by 10 tunes > G Button Start Playback > H Button • Voice Test > 000 Advance by 1 tune > I Button Advance by 10 tunes > J Button Start Playback > K Button Return to the menu with the A and B buttons
The numbers are obviously the selected sound effect, background music and voice sample codes. They advance when you press the C, D, G, H, J, and K buttons. There’s no way to go backwards, but they wrap back to zero after 255. Press E, H or K to start the selected sound effect, background music or voice sample (or restart it if it’s already playing). There’s no stop button – you have to wait for it to finish. It even keeps playing if you return to the menu! Speaking of which, you can return to the test menu by pressing the A and B buttons simultaneously.